Farewell Tour
(Warning: picture heavy post)
In December 2014, my husband and I purchased our first house together. Charlottesville is an expensive market for real estate, so we chose a fixer upper (before it was a show or a hashtag). I believe there is something in us that longs to see the old made new again, the ugly erased by beauty, the forgotten and rejected beloved once more. And so we set our hearts and bodies to this test.
While we lived here, it just felt like the house of never-ending projects. But, as I was writing my last blog post, I realized that we really had accomplished a lot for this little place. And I want to celebrate that here today with before and after shots of our house. Welcome to 1234 Holmes Avenue! #bestaddressever
Our sad little house was stuck in the 70s, with orangey oak trim and doors, wood paneling, avocado appliances and all, so the first thing I tackled was painting all. the. things. Trim, doors, walls, hardware, door knobs, air vents...
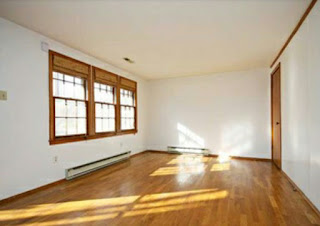
Living room BEFORE:


Living room AFTER:

 A little paint goes a long way, doesn't it?
The kitchen is the room that saw the biggest transformation (and took the most work!).
Kitchen BEFORE:


When we bought the house, we thought that the kitchen was basically a blank slate to make into anything we wanted. Boy, were we wrong! There were all kind of constraints that made a better layout challenging - the entrance to the basement, the entrance to the living room, the exterior door leading to the deck, the big windows that let in so much light, and the electrical panel located in a prime cabinet spot. It took months of brainstorming and measuring to come up with the new floorplan - and then we had to actually do it! Here are some in-progress shots:


We tried to reuse the existing cabinets by painting them, but we ended up with this sticky mess that even my dad's garage full of chemicals couldn't penetrate. But some of the old cabinets did find their way to Kevin's workroom in the basement, so all was not lost.
Behold the final result!
Kitchen AFTER:


 We love
 DIY saving money, so we furnished our space with stuff we made, found, inherited, or bought used at the Habitat Store or on Craiglist. The built-in breakfast nook is made up of two sets of kitchen nook table and chairs (like this) we bought on Craigslist, sanded down, and stained/painted, then reassembled to make this set that fits the space perfectly. I love how it turned out!
The basement also saw some big changes, including removing a wall that was flimsy enough Kevin took it down one night while I was out for dinner with friends. He also painted all the ceiling tiles to get rid of the dingy (smoke-stained?) tinge, which was not accomplished in one night, and put in new flooring.
Basement BEFORE:

Basement AFTER:


And look at these cute Pinterest-inspired stairs! (Special shout out to my sister for making my ambitious idea a reality.)

In the bedrooms, all that was really needed was to paint the trim and doors (which sounds like no big deal, but that oak trim takes A LOT of coats of paint to cover!).
Master BEFORE:

Master AFTER:


The other two bedrooms were so blah they didn't even get before shots, but here are the AFTERs:


The bathrooms were sorely in need of style and updating.
Master bath BEFORE:


Hall bath BEFORE:
 Hall bath AFTER:

That concludes our home tour. Thanks for indulging me on this departure from my usual blog fare. Marie Kondo says that we should thank our belongings before we get rid of them and I guess that is kind of what I'm doing with this post. Thank you, house. We learned a lot from you. We hope you find another family to love you.

In December 2014, my husband and I purchased our first house together. Charlottesville is an expensive market for real estate, so we chose a fixer upper (before it was a show or a hashtag). I believe there is something in us that longs to see the old made new again, the ugly erased by beauty, the forgotten and rejected beloved once more. And so we set our hearts and bodies to this test.
While we lived here, it just felt like the house of never-ending projects. But, as I was writing my last blog post, I realized that we really had accomplished a lot for this little place. And I want to celebrate that here today with before and after shots of our house. Welcome to 1234 Holmes Avenue! #bestaddressever
Our sad little house was stuck in the 70s, with orangey oak trim and doors, wood paneling, avocado appliances and all, so the first thing I tackled was painting all. the. things. Trim, doors, walls, hardware, door knobs, air vents...
Living room BEFORE:


Living room AFTER:


The kitchen is the room that saw the biggest transformation (and took the most work!).
Kitchen BEFORE:


When we bought the house, we thought that the kitchen was basically a blank slate to make into anything we wanted. Boy, were we wrong! There were all kind of constraints that made a better layout challenging - the entrance to the basement, the entrance to the living room, the exterior door leading to the deck, the big windows that let in so much light, and the electrical panel located in a prime cabinet spot. It took months of brainstorming and measuring to come up with the new floorplan - and then we had to actually do it! Here are some in-progress shots:


(getting help from Paco, our foster dog at the time)


Behold the final result!
Kitchen AFTER:


The basement also saw some big changes, including removing a wall that was flimsy enough Kevin took it down one night while I was out for dinner with friends. He also painted all the ceiling tiles to get rid of the dingy (smoke-stained?) tinge, which was not accomplished in one night, and put in new flooring.
Basement BEFORE:

Basement AFTER:


And look at these cute Pinterest-inspired stairs! (Special shout out to my sister for making my ambitious idea a reality.)

In the bedrooms, all that was really needed was to paint the trim and doors (which sounds like no big deal, but that oak trim takes A LOT of coats of paint to cover!).
Master BEFORE:

Master AFTER:


The other two bedrooms were so blah they didn't even get before shots, but here are the AFTERs:


The bathrooms were sorely in need of style and updating.
Master bath BEFORE:

Master bath AFTER:

Hall bath BEFORE:


That concludes our home tour. Thanks for indulging me on this departure from my usual blog fare. Marie Kondo says that we should thank our belongings before we get rid of them and I guess that is kind of what I'm doing with this post. Thank you, house. We learned a lot from you. We hope you find another family to love you.


Holy COW!!! This is amazing!
ReplyDelete